Tuesday, December 28, 2010

The Five-Year-Old Answering Service

I have copped a few interesting remarks lately about allowing Charlotte to answer our phone – as though I was the one who taught her how to click the green button and just say “hello”.

Charlotte has learned how to use a phone much the same way as she’s learned most things I’d prefer she didn’t do.  By watching either Charles or myself very carefully, memorising what we appear to be doing and trying it out for herself when we’re not around.  

In this case the first indication we had that she knew how to use the phone came a month or so ago when we caught her with the handset pressed up to her ear.

“Oh no thanks,” she said into the phone, “I just like listening to the beautiful music.”

And then she clicked it off.  Redial revealed that she’d managed to call the paediatrics unit of Calvary Hospital. 

A few days later and she answered her first call when we didn’t get to the phone in time.

While she might not know correct phone answering etiquette yet we’ve figured out that she has just enough phone answering savvy to be rather useful.  People we know are aware that we are taming a five-year-old and will address her in person and then ask for one of us to be put on the phone.

People who don’t know us – like telemarketers for instance – are an entirely different matter.  Charlotte recently answered the phone and walked slowly around in circles saying “Mhm” and “Aha” and “OK” every few seconds.  She then paused and said in her most polite voice, “Look I’m really sorry but I just don’t think we know you.  But thanks for calling!”

And she hung up.  Solid gold.

Christmas Crafts - Stockings

A few caveats for today’s Christmas craft – first up, it’s not as easy as some of the others I’ve blogged about.  You’re going to need a skill level or two up from slapping the good ol' Clag around on construction paper.  It’s also going to be mighty difficult if you don’t have a sewing machine or an iron.  Mind you, if you do have a sewing machine, all you need to know is how to sew a straight stitch.

Secondly my photos are not great.  I was tired, it was late and honestly the lighting was not brilliant.  But given that I was making these at ten in the night on the night before Christmas Eve, I think I can be forgiven for dodgy photos.  Honestly, you’re lucky I documented any of it at all.  So, let’s get to it. 

For this project you will need:

60cm of felt in your dominant colour (I went pink for Charlotte and blue for James)
Coloured fabrics to suit your colour theme (for James I went for vibrant blue and red with a pirate flavour and for Charlotte I went with softer pink, purple and yellow fabrics with hearts, butterflies and flowers)
Various braids that match your theme (I’ve chosen sequined braid, ribbon and bright red decorative braid)
20mm Ribbon to edge your stocking.
Decorative buttons
Sewing Machine
Scissors
Thread

First up, you need to create a template.  Basically grab some paper and draw a stocking shape onto it.  When you’re satisfied with the shape, cut it out.


Then place your template over your felt and cut a stocking shape from your felt.


Pick your first piece of fabric and place it onto the felt.  Sew it down on both sides.  


In this case I used an embroidery machine to embroider the names of my children on some plain fabric to start me off.  If you don’t have access to this sort of machine but still want your child’s name on the stocking you can either cut the letters from some contrasting felt and sew it on with thick cotton down the middle of your letters or you can use iron-on transfer letters which retail for about $1 each.

All you do from here is make strips of brightly coloured fabric (either a strip from one fabric or do what I’ve done and sew a couple of different bits of fabric together to make a strip.  Place the first strip face down on top of your original piece of fabric and sew a line a quarter of an inch (6mm) in from the edge.  Make sure your original stitch is behind your new stitching.


Use an iron to press the new piece of fabric back flat against your felt and continue to add strips at different angles until all your felt is covered.  


Then flip your felt over and trim the fabrics back to the felt stocking shape.  Now is a good time to sew your strips of braid/sequins/ribbon on and add any decorative buttons.

When your front panel is finished, cut a second piece of felt from your template.  Sew your ribbon around the whole edge of the stocking except for the top edge.  Make sure most of the ribbon hangs over the edge (so maybe 5-8mm of ribbon should be lying on the felt with more than 1cm extending out past the edge of the felt).


Place the front piece with the coloured fabric on top of the backing felt, fold the ribbon over and stitch through all the layers.  This binds your stocking together and finishes the edge so it won’t fray.  Finally fold the remaining ribbon in half over the top edge and sew all the way around so the top edges of your stocking are bound nicely and finished. 

The last thing to do is use your ribbon to make a nice big loop (big enough to go over a door handle, for example) inside your stocking at the top corner.  This completes your stocking.


Each stocking took me about an hour but my kids adored them and it was absolutely worth all the pain the binding caused me.  


Come Christmas morning Santa had left little treats for them.  As I did the dishes I realised that I hadn't heard the little Viking for quite some time.  I turned to discover him sitting on the floor behind me.  He'd managed to nab his stocking and was plonked down in the middle of his loot attempting to devour all chocolate and other miscellaneous sugar-related items before he was discovered.


Three days later and he's still bringing me the empty stocking to indicate that he wants something sweet.  Very cute.


Tip Shopping and Revamp Project - Plant Stands


Today I’m going to share with you one of my cheapest, most favourite tip shopping bargains – plant stands.  These ones come up time and time again purely because the way they’re originally made means they start to look like crap in fairly short order and people have no idea how to make them look nice again.  The plastic coating cracks, rust sets in, then the plastic peels off even more and suddenly you’ve got the gardening equivalent of a clapped out Datsun 120Y.  Clearly people went nuts for them at some time or other (I’m guessing the 80s when everything was plastic) because there’s always at least one when I make it to the tip shop.


When I dragged these three little beauties up to the tip shop counter all pretence at bargaining was immediately abandoned by the Tip Shop Goddess behind the counter.  


She couldn’t control the sneer as she said, “Oh God, why would you even want them?”  So all I had to do was smile/grimace apologetically and mutter something about installing a herb garden out of sight behind my garage*.  I could tell she wanted to give them to me purely because I’d gone to the effort of hauling them out from the yard but she shrugged and said $10 for all three.  Bonus!

Once you get them home your first step needs to be stripping the remaining plastic off.  Do not be tempted to use a wire brush, your fingers or any sort of sand-blasting power-washing arrangement.  The quickest way is to use the claw of your hammer.  


Drag it along the wire and watch all that plastic flake away.


After you've got as much off as you can with the claw you’ll need to use something reasonably pointy to jab out the more resilient bits of plastic trapped in the corners.  I like to use the pointy end of my spade bit from my drill set.  This three tiered stand took me about 20 minutes to strip all the plastic.  


Next bend anything that’s been bent back into shape.


The final step is to use Kill Rust paint in the colour of your choice (I personally always use gloss black - classic, goes with everything and plus I bought in bulk and will probably get to the bottom of the massive tin I bought right around the time the sun becomes a black hole) to paint your plant stand.  I don’t bother sanding or priming – just whack it on over the top of the rusty frame and it’ll be good for another ten years.  Do two coats and you might be good for 15-20.  I use a very cheap brush and I don’t bother using anything on it to clean it up – I just chuck it.  For economy I like to do a few things all at once – your brush might only cost $1.34 but why be wasteful?

This particular plant stand was destined to be a Christmas gift for my sister-in-law and her beau.  They're mad keen cooks and they've been hankering for a kitchen garden for a while now but they rent and they’re uber busy.  So a plant stand filled with pots of herbs was an ideal gift for them.


For added kook factor and to save even more $$$ you could buy a bunch of old saucepans and crock pots from the tip shop, drill some holes in the bottoms and use them for the pots.  In this instance the plants were a gift and I wasn’t sure the recipients would appreciate such an interesting arrangement or get the humour** so I went for more traditional glazed pots instead.


And there you have it – plant stand revamped for under $5 and half an hour or so of your time or buy it new for $60. 

*  I am all for bargaining tactics to get the right price as anyone who read my first post on tip shopping would know.  However it is important to not take it too far.  When you know it's a bargain, then it's a bargain and you should just cough up rather than risk angering the Tip Shop God/Goddess serving you.  A little bit of drama to get a great price on a special piece won't damage the relationship but if you get a reputation as a stingy bugger who constantly tries to avoid paying any cash then they will make it their mission to bend you over a barrel every time you visit.  Best to make friends, pay what they're asking when it's a bargain and save your Academy Award Nomination for a moment that really deserves it.
** A kitchen garden in pots!  Get it!  Ha ha!  

Sunday, December 19, 2010

Quantum Computing, Binary and Marriage

My husband and I are extremely well matched in a lot of ways.  Intellectually our IQs are similar.  When the national IQ test was on television a couple of years ago we both did it and discovered that we’re only two points apart.  The Myers-Briggs personality test seems to think we’re similar too.  Charles is an INTJ and I’m an INFJ.  What’s the difference between those?  The difference is that he tends towards thinking (T) and I tend towards feeling (F)*.

But where we differ we differ big time.  We might rate at the same level on the intelligence scale but the direction we’ve sent our learning in – what we’ve actually done with our smarts – couldn’t be more different.  Charles is obsessed with all things computers, physics and quantum while I’ve headed down sociological, anthropological and psychological paths.

Having a wife with those sorts of leanings is of great benefit to Charles.  When he annoys someone or upsets them and can’t understand why I can usually clue him in before he’s finished closing his mouth from explaining to me what happened.  I can also usually word him up on ways to handle delicate situations so he doesn’t wind up being counselled about his abrasive attitude.

I take advantage of his strengths too.  Were it not for Charles I would have spent the gross domestic product of a small African nation on IT support for my computer.  I’ll only grudgingly hand him this one because I’m fairly certain that 90% of my issues are a direct result of the complicated way he’s set everything up in the first place.

But there are downsides to living with and loving an IT geek with a love of all things science and one of those is that conversations designed to inform and educate me almost invariably leave me feeling dumber than when I started.

The most recent example involves the new concept of “quantum computers”.  As a spouse it’s your job to be interested in the things that interest your partner, even if you only nod and smile in the right places while they use you as a sounding board.  Charles recently announced on the drive out to a friend’s house that he was sure the answer to artificial intelligence lies in the new area of quantum computing.

After almost ten years together this sentence immediately set off the warning bells.  Murky waters ahead, treacherous submerged objects, sound the alarms, you’re going down sister.  Cautiously I asked what quantum computing is all about.

So Charles decides to start by explaining binary in quantum computers.  Now, binary and I have a spotty track record.  I get that it’s all about a base two counting system.  I know it’s used in computing as an on/off mechanism and that data is stored in complicated arrangements of binary. 

Unfortunately I’ve never really understood much beyond that.  I can’t count in binary, I don’t know why Charles “turned 100000” this year or why that’s even funny.  I do not get this XKCD cartoon;

Tree

Binary is just one of those things that will always be a weird concept that just narrowly escapes me.  Here’s how our quantum computing/binary conversation went**;

Charles:  Okay so you know that binary means it’s either a 0 or a 1 which means that it’s either on or off?
Me (dubiously):  Okay…
Charles:  Well with a quantum bit it’s on AND off at the same time!  Isn’t that brilliant?!
Me (wincing): Ngyah…*spoink*  I like purple!  It’s so PRETTY!

Subsequently he decided to have this same conversation with his equally science-obsessed step-father out of my earshot.

*  While we only differ in one particular area of personality I can safely say it’s a critical one.  Every single argument we’ve ever had in our entire relationship comes down to the difference in perception between a mostly thinking individual and a mostly feeling one.  We have had some DOOZIES.
** For the record I always let Charles vet any post that refers to him so I don’t post something that will upset him.  He made the following comments about this post;
About our setup; “It’s not a complicated arrangement…”
About turning “100000;  “It IS funny….
About my recollection of the conversation; “There’s no such thing as quantum binary”.  Then he fixed what I’d written to more accurately reflect what he said.

Saturday, December 18, 2010

Christmas Craft - Designer Ornament

The inspiration for these ornaments came from a bunch of designer-made ornaments I saw on one of the news sites.  They were charging something like $49.95 for each one but I quickly realised I could make my own for about $3 each and a few minutes out of my life.

These ornaments are pretty similar in difficulty to the inspirational words I wrote about earlier and you’ll need similar supplies to make them. 

Specifically;

MDF crafty shapes
Decorative paper
Adhesive (PVA or spray)
Contrasting paint
Brass screw-in loops
Ribbon

Follow the instructions from the inspirational words blog to cover both sides of the craft shapes with your chosen decorative paper.

Once the glue has dried paint the rims of the decorative shapes in a contrasting colour.

When the paint’s dry screw your brass loops into the top of your ornament. 


You might have to press quite hard to get the screw to grab but the MDF should be soft enough that you can do it by hand.  Make sure you hold the ornament firmly on the sides while you screw the loop in to prevent the ornament from splitting.


When you’re finished thread your ribbon through the brass loop and either tie it into a bow or sew/glue the ends together.  I personally prefer to secure mine with a few tiny stitches.


Voila, you have your own personalised, designer ornaments.  We tied ours to the top of the basket holding our gingerbread trees and other assorted hand-made gifties* for the family and we let people choose their own.


*  Those gorgeous timber trains you can see in the basket were made by Charles for the kids.  They’re also 100% his own design and I’m planning to document how they’re made in a later blog complete with plans.

Friday, December 17, 2010

I'm the Mother of "Those Kids"

Today Charlotte and James’ childcare centre had their end of year concert.  The parents all assemble in the playground and then each room performs a song and a small, simple routine the children can follow.  First up are the babies and toddlers. 


James looked a bit bemused by it all and was craning his head around, looking for me.  Then he spotted me. 


He instantly broke ranks and made a beeline for me...  


...while all the other well-behaved non-addicted children sat down nicely to perform their song.


As soon as the music started and he saw his buddies performing the familiar routine James decided he might like to check it out and shake his maraca a little.


He managed to sit down and do what he was told for at least five seconds.


Then he realised he wasn’t with Mama and had to be physically restrained...


...while all the other children sat nicely.  When he wasn't immediately released he began releasing a series of squeals and other assorted protestations that increased in pitch, volume and urgency until the carer wisely decided that it might be better to just let him go so people could actually hear their own children.  

This made James happy.  He decided it was much more fun to try and put the lens cap on my camera while I tried to take photos.


Throughout the other performances I sat next to my sister-in-law Jen and her daughter Chloe, who is only a month older than James.  Chloe behaved like a perfect angel and happily sat in her mother’s lap throughout most of the concert.


You know that one kid who insists on running around being the centre of attention, squealing and generally just indulging their own whims while everyone else tries to ignore them?  Yeah I remember having a small daughter like Chloe and thinking, “Who is that kid?  Where is his mother and why is she doing nothing to control his outrageous behaviour?”

Well the karmic balance has been adjusted and I have a brand new understanding of that woman thanks to James who continued to cycle between sitting with me momentarily…


…standing up and shouting at the audience…


…flashing the audience…


…parading up and down in front of the other children who were trying to perform…


…cheekily defying the attempts of carers to contain him…


…emitting high pitched squeals of delight at the top of his lungs…


…and applauding his own efforts.


I was thoroughly mortified and made several attempts to contain him.  Unfortunately, much like the poor carer, I quickly realised the futility of attempts at containment because James would wail inconsolably until released.  

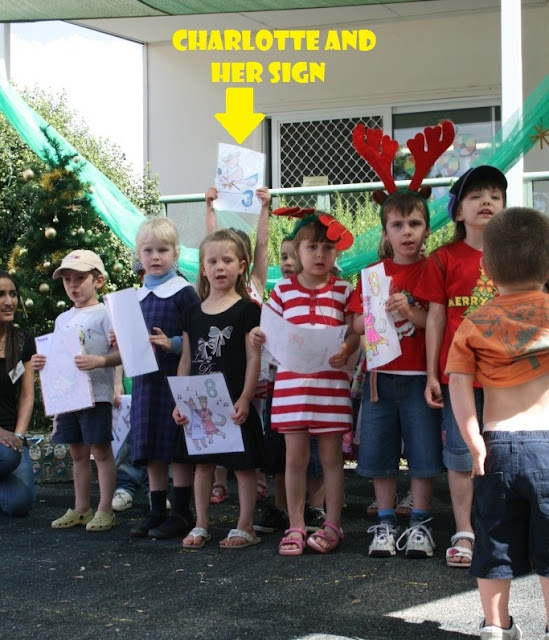
Meanwhile, Charlotte had her own performance issues.  Because she’s tall (I assume) she was placed in the back row during her performance.


Her recitation was an Australianised version of “The 12 Days of Christmas”.  Despite being thrown in the back her enthusiasm remained undampened and every single time they got to “three red galahs” she would thrust her number three red galah sign as high as it would go.


Fortunately for her there was a more important component.  Graduation from preschool.  She was super cute in her graduation robe.  The missing front tooth and hand holding added to the cuteness factor.


Her decorum lasted all the way through the presentation of her certificate…


...long enough for a photo of her with said certificate…


…then she rounded up "that naughty little guy"…


…and crash tackled him.


At this point I gave up and let them go for it.